en:help:tutorial:using_secure_storage
Table of Contents
Using Secure Storage
Visual Tutorial

How to use your Secure Storage
To manipulate an existing Secure Drive, you must first create it and then mount it.
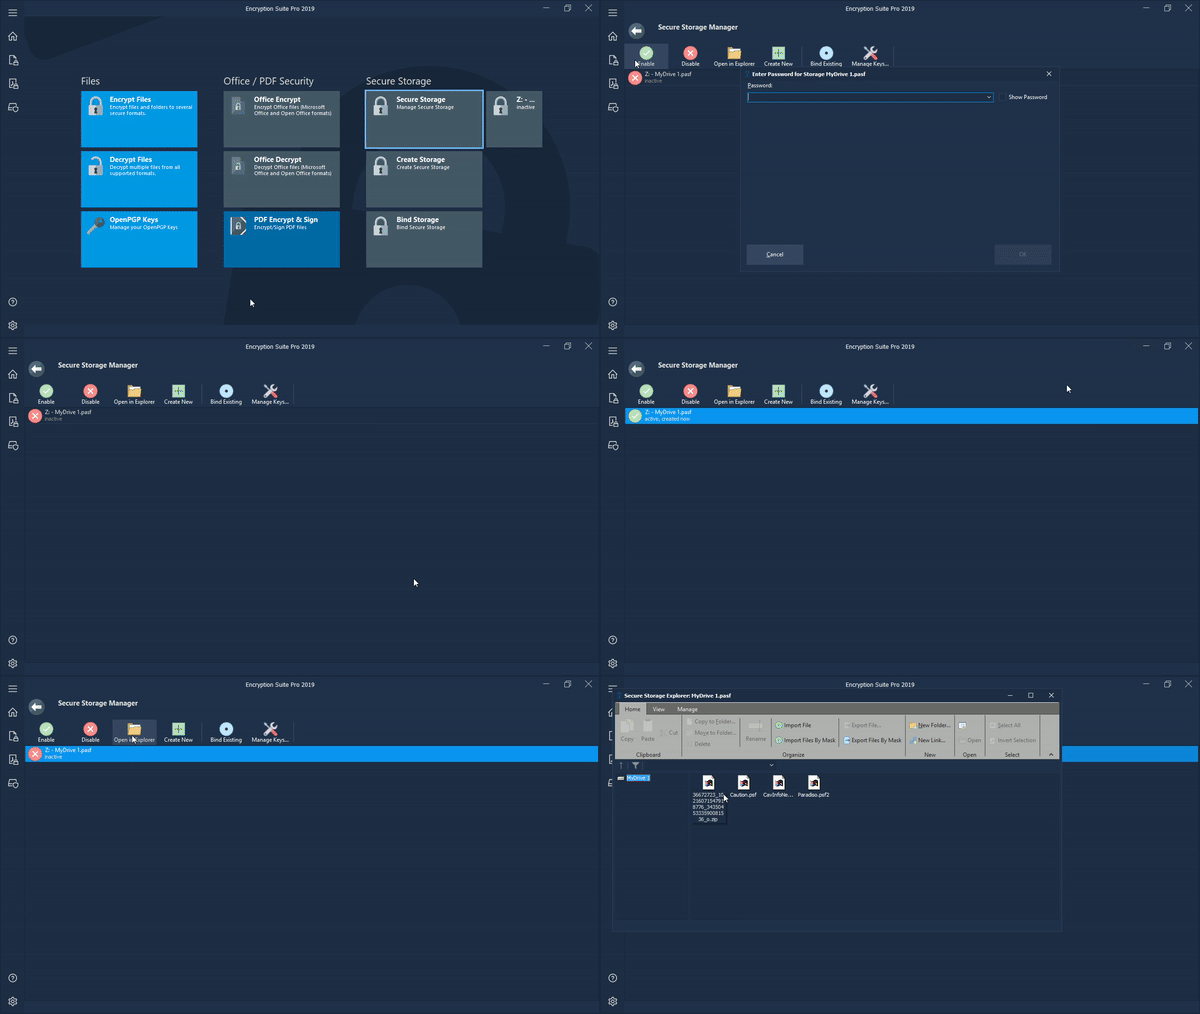
Created drive(s) will appear in the Secure Storage Manager window where you can left click to select the drive you want to mount and click Enable to mount it. You will be asked to enter the password of the drive and once the correct password is entered, your Secure Drive will be enabled(mounted) and will appear.
Depending on your choice of how you chose to create your drive, it will appear as an additional drive on your computer(D:, G:, U:, etc.), as a folder in the location of your choice or a network folder.
Once your drive has been enabled(mounted) you may proceed to place files/folders into that location in 2 ways:
- Windows Explorer - you may open Windows Explorer where the drive/folder will appear as any local/regular drive that you have on your computer. You will see the drive/folder appear as the rest of the drives/folder on your computer and you may then copy/paste files in it or click and drag files to that folder and those files will be stored on your Secure Drive and will show there as long as your Secure Drive is enabled(mounted).
- Open in Explorer - From the Secure Storage manager, select the drive you wish to access and click the Open in Explorer button which is located in the toolbar of the Secure Storage Manager window. Windows explorer will then in the location of your drive/folder and you may then use it. If your drive is not enabled, you may still click the Open in Explorer button and the Encryption Suite Explorer will open up, enter your Secure Drive password and your drive will open in the internal Encryption Suite Pro explorer.
You should now see a listing of the files contained within your drive which you may update as needed. Once you exit the internal Encryption Suite explorer your drive is not accessible until opened again with the correct password.
Please Note:
This tutorial approaches the topic using the main Encryption Suite window as its base of operations. You may also use the Encryption Suite Helper, located in the system tray, by right clicking it. There, you will your drives shown and when clicking on a specific drive with your mouse, you will be able to perform the same actions as those in the Secure Storage Manager.
en/help/tutorial/using_secure_storage.txt · Last modified: 2018/10/26 02:57 by mili