Advanced Installation instructions
Detailed instructions on how to setup PowerArchiver for deployment within multiple user environment.
1.0 Introduction
PowerArchiver Advanced installation document will show you how to install and maintain PowerArchiver . It is not specific to any environment as all the methods used should work everywhere – from network installations, disk images to Terminal Server/Citrix installations.
We have tried our best to make the process as straight forward as possible, so an experienced administrator should be able to find everything working to their liking.
If you have any suggestions for the future releases, we welcome your feedback via our support form: http://www.powerarchiver.com/support/
1.1 License Versions
There are 6 basic licenses for PowerArchiver – Standard, Professional and Toolbox in English and Multilingual/International variations. English license will give you access ONLY to English language of PowerArchiver, while International license will give you access to any language version of PowerArchiver, including English. All versions are distributed in same installer, and once registration code is applied PowerArchiver grants user access to appropriate features. If Standard license code is used, all Professional features are removed from PowerArchiver without exception.
1.2 Changes from previous versions of PowerArchiver
We made several major changes:
- By default, PowerArchiver registration name and number is stored in HKLM, and not HKCU as before. This pre-registers PowerArchiver for all users on computer, as you can read in section 3.0.
- We change storage of registration name and code to binary format, from ASCII. That means that you will first need to register PowerArchiver and then go to
HKCU\Software\PowerArchiverin order to obtain proper values if you are going to use registry script for setting installation options. By default, in your order email you will receive ASCII values. - All versions are multilingual now due to improved compression and online help system. Offline help system is available upon request.
- IMPORTANT! Settings are now always stored in (for x64 OS):
HKEY_LOCAL_MACHINE\SOFTWARE\Wow6432Node\PowerArchiverInt - During installation, PowerArchiver will copy all the settings from previous installations that used
HKEY_LOCAL_MACHINE\SOFTWARE\Wow6432Node\PowerArchiverIntto the new key.
2.0 Download MSI Installation
Here you can download latest PowerArchiver installation (All Languages/Versions) - for all Windows OS versions: Windows Server 2003, XP, Vista, Windows 7, Windows 8/8.1, Windows 10 and Windows Server 2008, 2012, both 32bit and 64bit, as well as any future Microsoft OS's.
Multilingual: http://www.powerarchiver.com/download/
Installation is packed via PowerArchiver SFX. To get MSI file (make sure PowerArchiver is installed first), right click on .exe and select Extract here. This will extract MSI installation out of SFX.
PLEASE NOTE: Please always save specific MSI you have used for installation, because it will make it much easier for you to uninstall PowerArchiver in the future.
2.01 Download Offline Help MSI Installation
Download HELP file: http://www.powerarchiver.com/download/
2.1 MSI Switches
Here are some more important MSI switches and properties for installation.
- /qn – quiet installation with no UI.
- /norestart – do not restart if installation is complete.
- /forcerestart – forces restart after installation.
- /uninstall – uninstalls PowerArchiver
- APPDIR=<path> - sets installation path
- AI_DESKTOP_SH – set Desktop shortcut property
- ADDSTART – set Start Menu shortcut property
- ASSOCIATE – associate with common formats property
- ENABLEQUEUE – enable queue property (also starts PowerArchiver Starter – system tray application)
- SHOWCONF – show config to first users property (not shown if you set HKLM key as specifed in instructions below).
- CHECKBOX_1_PROP – show latest news popup after installation.
- NOPATCHBEAM - Does not install Patchbeam during PowerArchiver installation.
- PINTASKBAR - Pin to taskbar feature.
More switches can be found by executing following at command line:
Powarc1400.msi /?
Example:
msiexec /i „powarc1600.msi“ ENABLEQUEUE=““ CHECKBOX_1_PROP=““ APPDIR=C:\Test /qn - Installs PowerArchiver quietly into the „C:\Test“ folder, disables Enable Queue checkbox and latest news popup in installer.
3.0 Understanding PowerArchiver Registry
Most important part of PowerArchiver installation is how it deals with registry. While PowerArchiver uses HKCU to read current user settings, it also reads HKLM to determine if an administrator has already setup predefined settings for user. By using an HKLM key, administrator can force any setting they wish and current user will not be able to change it. At minimum, you should use it to pre-register all users on computer.
IMPORTANT: HKLM keys are different on x86 (32bit) and x64 (64bit) Windows!
- Windows x86 (32bit): HKEY_LOCAL_MACHINE\SOFTWARE\PowerArchiverInt
- Windows x64 (64bit): HKEY_LOCAL_MACHINE\SOFTWARE\Wow6432Node\PowerArchiverInt
For advanced option settings see under section 3.0.
3.1 Example registry usage
PowerArchiver stores all of its settings under:
“HKEY_CURRENT_USER\Software\PowerArchiverInt” – International/Multilingual versions of PowerArchiver
You can create „default“ forced settings by copying one or more of registry settings to:
“HKEY_LOCAL_MACHINE\SOFTWARE\Wow6432Node\PowerArchiverInt”
IMPORTANT: Please copy only keys that you wish to use, do not copy all of them!
3.2 PowerArchiver behavior change with HKLM key detected
PowerArchiver behaves differently if it detects its HKLM key while being started for the first time from specific user account.
- If it detects the HKLM key, it uses its settings and automatically writes in all the default values for rest of the settings.
- If it doesn’t detect HKLM key, it shows user configuration screen upon startup and then writes default settings.
As you can see, it is very important that you use HKLM key properly, especially for registration info. All current and future users on that computer will automatically be registered for PowerArchiver, first time they start PowerArchiver, as long as HKLM registration key is present. HKLM settings will be applied every time PowerArchiver is started so user will not be able to change those settings without modifying registry (and having administrator privileges).
3.3 firstrun.reg usage
In PowerArchiver, there is an additional installation feature. You can distribute firstrun.reg file in the installation destination folder of PowerArchiver, and if PowerArchiver is being run for the first time, it will copy firstrun.reg information to the registry. It is meant to replace usage of HKLM key for those who find it more appropriate for their installation scenarios. As with HKLM, you should use it at least with registration key. Unlike with HKLM keys, registry settings that are set via firstrun.reg can be changed by the end user.
3.4 Advanced registry options
Here are some examples of registry settings that you can place under HKLM registry key. Once again, please force only keys that you want to use. You will Keep in mind that user will not be able to change any of these settings on their own, so you might want to consider saving some of them under HKCU (e.g. Palanguage).
IMPORTANT : Since version PowerArchiver 2011, we have changed method of storing registration name and code in the registry, it is stored in binary format (and in email, they are sent as ASCII). You will have to enter it into PowerArchiver program and then check: HKEY_LOCAL_MACHINE\SOFTWARE\Wow6432Node\PowerArchiverInt\General Regname and Regnumber in order to get actual binary values needed for your registry script!
- „RegnameW”=xxx (HKEY_LOCAL_MACHINE\SOFTWARE\Wow6432Node\PowerArchiverInt\General) – PA registration name. Recommended!
- „RegnumberW”=xxx (HKEY_LOCAL_MACHINE\SOFTWARE\Wow6432Node\PowerArchiverInt\General) –– PA registration code. Recommended!
- “securepasswords”= dword:00000001 (HKEY_LOCAL_MACHINE\SOFTWARE\Wow6432Node\PowerArchiverInt\General)– sets 256bit AES encryption as only possible encryption in PowerArchiver, in order to make sure that your users are using only the strongest encryption. User can still extract from all supported encryption methods.
- “noonline”= dword:00000001 (HKEY_LOCAL_MACHINE\SOFTWARE\Wow6432Node\PowerArchiverInt\General) – PowerArchiver will not check and download web updates, even if your user tries to manually check for them. This setting will also make sure that no usage statistics are sent back to ConeXware regardless of user selection. Recommended!
- “Palanguage”=e (HKEY_LOCAL_MACHINE\SOFTWARE\Wow6432Node\PowerArchiverInt\General) – Force any language setting to the user. Same language shortcut is used in installation names, so for “German” language, enter “g”. If not entered, user will be able to select their own language based on their own preferences.
- “ClassicToolbar”= dword:00000000 (HKEY_LOCAL_MACHINE\SOFTWARE\Wow6432Node\PowerArchiverInt\General) – 1 forces Classic toolbar option, while 0 forces Modern toolbar.
- “DisableAutoUpdate”= dword:00000001 (HKEY_LOCAL_MACHINE\SOFTWARE\Wow6432Node\PowerArchiverInt\General) – Disables Web Auto Update.
- “DisableBackup”= dword:00000001 (HKEY_LOCAL_MACHINE\SOFTWARE\Wow6432Node\PowerArchiverInt\General) – Disables Backup utility and removes it from all menus.
- “DisableBurning”= dword:00000001 (HKEY_LOCAL_MACHINE\SOFTWARE\Wow6432Node\PowerArchiverInt\General) – Disables all burning options and removes them from the menus.
- “DisableFtp”= dword:00000001 (HKEY_LOCAL_MACHINE\SOFTWARE\Wow6432Node\PowerArchiverInt\General) – Disables all FTP options and removes them from the menus.
- “DisableLanguage”= dword:00000001 (HKEY_LOCAL_MACHINE\SOFTWARE\Wow6432Node\PowerArchiverInt\General) – Disables all language options.
- “DisablePlugins”= dword:00000001 (HKEY_LOCAL_MACHINE\SOFTWARE\Wow6432Node\PowerArchiverInt\General) – Disables all plugins.
- “DisablePPM”= dword:00000001 (HKEY_LOCAL_MACHINE\SOFTWARE\Wow6432Node\PowerArchiverInt\General) – Disables Password Manager that saves used passwords.
- “DisableSkins”= dword:00000001 (HKEY_LOCAL_MACHINE\SOFTWARE\Wow6432Node\PowerArchiverInt\General) – Disables all skins.
- “DisableClouds”= dword:00000001 (HKEY_LOCAL_MACHINE\SOFTWARE\Wow6432Node\PowerArchiverInt\General) – Disables access to Cloud features (new in 2013).
- „AssocAllUsers“=dword:00000001 (HKEY_LOCAL_MACHINE\SOFTWARE\Wow6432Node\PowerArchiverInt) – Associates PA with common formats for all users.
- „Associate with Zip files“=dword:00000001 (HKEY_LOCAL_MACHINE\SOFTWARE\Wow6432Node\PowerArchiverInt) – Associates PA with common archives automatically.
- „Check for Zip association“=dword:00000001 (HKEY_LOCAL_MACHINE\SOFTWARE\Wow6432Node\PowerArchiverInt) – Shows association screen at startup if one the formats is not associated (so you can disable it).
- „efolder“=dword:00000004 (HKEY_LOCAL_MACHINE\SOFTWARE\Wow6432Node\PowerArchiverInt\General) – Sets Extract window to always start in My Documents folder.
- „PMinSize“=dword:00000008 (HKEY_LOCAL_MACHINE\SOFTWARE\Wow6432Node\PowerArchiverInt\General) – Sets password policy - „Minimum password lenght“
- „PPolicy1“=dword:00000001 (HKEY_LOCAL_MACHINE\SOFTWARE\Wow6432Node\PowerArchiverInt\General) – Sets password policy - „at least one lower case character“
- „PPolicy2“=dword:00000001 (HKEY_LOCAL_MACHINE\SOFTWARE\Wow6432Node\PowerArchiverInt\General) – Sets password policy - „at least one upper case character“
- „PPolicy3“=dword:00000001 (HKEY_LOCAL_MACHINE\SOFTWARE\Wow6432Node\PowerArchiverInt\General) – Sets password policy - „at least one numeric character“
- „PPolicy4“=dword:00000001 (HKEY_LOCAL_MACHINE\SOFTWARE\Wow6432Node\PowerArchiverInt\General) – Sets password policy - „at least one symbol character“
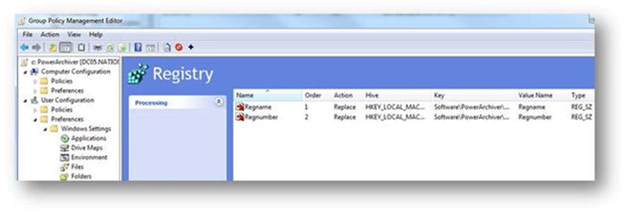
3.4 GPO and Registry options
As PowerArchiver uses registry to configure or force any of the options available, you can also use Group Policy Management Editor to configure any of the PowerArchiver settings on workstations. Use GPO Management Editor like in screenshot below with registry keys explained in section 3.4, and you will be able to easily push your desired settings to all workstations.
4.0 Example Installation
Here is a small example of possible installation.
4.1 Preparation stage
You will need to prepare registration key.
- First run PowerArchiver on test computer and register it using code that you have received.
- Run regedit.exe and go to the: HKEY_CURRENT_USER\Software\PowerArchiverInt\General
- Right click on the „General“ settings and choose to export it to the hard drive.
- Edit exported .reg file and delete every setting except: „RegnameW“=„xxx“ „RegnumberW“=„xxx“
- Replace the key location at the top with: [HKEY_LOCAL_MACHINE\SOFTWARE\Wow6432Node\PowerArchiverInt\General]
- This is what you should have in the .reg file now: [HKEY_LOCAL_MACHINE\SOFTWARE\Wow6432Node\PowerArchiverInt\General] „RegnameW“=„xxx“ „RegnumberW“=„xxx“
- Save the file patest.reg and double click on it to merge it with registry.
Now, you will have registration details entered into the HKLM key and user will not be able to change it. Additionally, when a new user logs in to the computer, PA will be smart and use that HKLM settings and at the same time fill every other setting that was not set with default values (in the HKCU key, so user can change it later). It works great for both image installs and network installs.
4.2 Example Installation
- Install PowerArchiver in silent mode:
C:\Powarc1600.msi /qn - Execute registry key you created for HKLM in silent mode:
Regedit /S C:\patest.reg
And PowerArchiver will be automatically installed, with default settings applied after first run. You can create a batch file (.bat) with these two commands and execute it. It will then execute these two commands sequentially.
5.0 Special Notes on Citrix
There is a slight incompatibility between Citrix's Windows emulation and Borland Delphi in which PowerArchiver has been created. When maximized, PowerArchiver entry will not appear in Windows taskbar. Here is the official Citrix Workaround:
- Run Regedit
- Go to HKLM\System\CurrentControlSet\Control\Citrix\wfshell\TWI
- Highlight the TWI Key, then from the Edit Menu select „Add Key“
- Type, TMainForm for the Key Name, and leave the Class: blank.
- Highlight the newly created TMainForm Subkey.
- From the Edit Menu, select „Add Value“
- Type, ClassName for the Value Name.
- Select, REG_SZ for the Data Type.
- Type, TMainForm for the „String“ value.
- From the Edit Menu, select „Add Value“ (again)
- Type the word „Type“ for the Value Name.
- Select, REG_DWORD for the Data Type.
- Type, <Hex 40 or Decimal 64 for Exception Flag> for the Hex Value.
This problem is only found when PowerArchiver is run in Citrix Application mode. Windows Terminal Services will work perfectly with PowerArchiver.
6.0 Support and other information
Please contact us if you need any kind of help with installation or anything else.
You can submit an ticket via: http://www.powerarchiver.com/support
Contact us via email: http://www.powerarchiver.com/contact
6.1 How to access your ConeXware Account
To get latest registration codes, please visit your account at: http://www.conexware.com/shop/